はじめに
本記事は、物体検出モデルであるRetinaNetを通して「モデルの概念理解」と「コードの理解」ができることを目的としたものです。そのため①モデルの解説、②コードの記述、という二部構成になっています。モデルの解説については「Focal Lossを提案した革新的物体検出モデルRetinaNetを解説!」(https://deepsquare.jp/2020/10/retinanet/)をご参照ください。
RetinaNetについて
RetinaNetとは、Facebook AI Research(FAIR)が2017年8月に発表した論文「Focal Loss for Dense Object Detection」で提唱されている物体検出モデルです。(その構造など理論的側面については、「Focal Lossを提案した革新的物体検出モデルRetinaNetを解説!」(https://deepsquare.jp/2020/10/retinanet/)をご参照ください。)
物体検出モデルは、大きく「一段構成」と「二段構成」の検出器に分類できます。多くの場合、「二段構成」検出器の方が正確ですが、速度が遅くなります。今回みていくRetinaNetは、速度を維持したまま精度を向上した一段構成のモデルです。特徴ピラミッドネットワークを使用して、複数のスケールでオブジェクトを効率的に検出しています。また独自のFocal Loss関数を新たに導入することで、物体と背景が画面上を占める割合が不均衡であるという「クラスの不均衡問題」を軽減します。
今回、ここでは実際のRetinaNetがどのように動ているのかを、コードから解説します。(なお、以下のコードはKerasの公式HPにある「Object Detection with RetinaNet」https://keras.io/examples/vision/retinanet/を参考にしております。)
準備
ライブラリーのインポート
import os
import re
import zipfile

import numpy as np
import tensorflow as tf
from tensorflow import keras

import matplotlib.pyplot as plt
import tensorflow_datasets as tfds
COCO2017のダウンロード
約118kの画像を含むCOCO2017データセット全体のトレーニングには時間がかかるため、今回は約500の画像からなるより小さなサブセットをトレーニングに使用します。
url = "https://github.com/srihari-humbarwadi/datasets/releases/download/v0.1.0/data.zip"
filename = os.path.join(os.getcwd(), "data.zip")
keras.utils.get_file(filename, url)

with zipfile.ZipFile("data.zip", "r") as z_fp:
    z_fp.extractall("./")
ユーティリティ関数の実装
ここでは一般的に利用するユーティリティ関数を実装していきます。
バウンディングボックスを変換する関数
バウンディングボックスは複数の方法で表すことができます。以下の2つの方法が一般的です。
・corner型:コーナーの座標を保存する[xmin, ymin, xmax, ymax]
・xywh型:中心の座標とボックスの寸法[x, y, width, height]
両方のフォーマットが必要なため、フォーマット間で変換する関数を実装します。
#ボックスの座標を並べ替える関数
def swap_xy(boxes):
    return tf.stack([boxes[:, 1], boxes[:, 0], boxes[:, 3], boxes[:, 2]], axis=-1)

#xywh型に変換する関数
def convert_to_xywh(boxes):
    return tf.concat(
        [(boxes[..., :2] + boxes[..., 2:]) / 2.0, boxes[..., 2:] - boxes[..., :2]],
        axis=-1,
    )

#corner型に変換する関数
def convert_to_corners(boxes):
    return tf.concat(
        [boxes[..., :2] - boxes[..., 2:] / 2.0, boxes[..., :2] + boxes[..., 2:] / 2.0],
        axis=-1,
    )
IOU(Intersection Over Union)を計算する関数
それぞれのボックスの重なりの程度に基づいて、正解ボックスをアンカーボックスに割り当てます。そのために、すべてのアンカーボックスと正解ボックス間の重なり度合いであるIntersection Over Union(IOU)を計算する関数を実装します。
# IOUを計算する関数
def compute_iou(boxes1, boxes2):
    # コーナーの座標を獲得する
    boxes1_corners = convert_to_corners(boxes1)
    boxes2_corners = convert_to_corners(boxes2)

    # Intersection(領域の共通部分)を求める
    lu = tf.maximum(boxes1_corners[:, None, :2], boxes2_corners[:, :2])
    rd = tf.minimum(boxes1_corners[:, None, 2:], boxes2_corners[:, 2:])
    intersection = tf.maximum(0.0, rd - lu)
    intersection_area = intersection[:, :, 0] * intersection[:, :, 1]

    # Union(領域の和集合部分)を求める
    boxes1_area = boxes1[:, 2] * boxes1[:, 3]
    boxes2_area = boxes2[:, 2] * boxes2[:, 3]
    union_area = tf.maximum(
        boxes1_area[:, None] + boxes2_area - intersection_area, 1e-8
    )

    return tf.clip_by_value(intersection_area / union_area, 0.0, 1.0)
探索を可視化する関数
実際にどのように物体検出が行われいてるかを可視化する関数です。
# 探索を可視化する関数
def visualize_detections(
    image, boxes, classes, scores, figsize=(7, 7), linewidth=1, color=[0, 0, 1]
):

    image = np.array(image, dtype=np.uint8)
    plt.figure(figsize=figsize)
    plt.axis("off")
    plt.imshow(image)
    ax = plt.gca()
    for box, _cls, score in zip(boxes, classes, scores):
        text = "{}: {:.2f}".format(_cls, score)
        x1, y1, x2, y2 = box
        w, h = x2 - x1, y2 - y1
        patch = plt.Rectangle(
            [x1, y1], w, h, fill=False, edgecolor=color, linewidth=linewidth
        )
        ax.add_patch(patch)
        ax.text(
            x1,
            y1,
            text,
            bbox={"facecolor": color, "alpha": 0.4},
            clip_box=ax.clipbox,
            clip_on=True,
        )
    plt.show()
    return ax
アンカーボックスを生成するクラス
アンカーボックスとは、モデルがオブジェクトのバウンディングボックスを予測するために使用する固定サイズのボックスです。RetinaNetの場合、特定のフィーチャマップ上の各場所に、9つ(3種類のスケールと3種類の比率の掛け合わせ)のアンカーボックスを設置します。アンカーボックスに関するクラスを実装します。
class AnchorBox:
    #Attributes:
    #  aspect_ratios: アスペクト比を表すリスト
    #  scales: アンカーボックスのスケールを表すリスト
    #  num_anchors: アンカーボックスの数
    #  areas: 各特徴マップのアンカーボックスの領域を表すリスト
    #  strides: ストライドのリスト

    def __init__(self):
        self.aspect_ratios = [0.5, 1.0, 2.0]
        self.scales = [2 ** x for x in [0, 1 / 3, 2 / 3]]

        self._num_anchors = len(self.aspect_ratios) * len(self.scales)
        self._strides = [2 ** i for i in range(3, 8)]
        self._areas = [x ** 2 for x in [32.0, 64.0, 128.0, 256.0, 512.0]]
        self._anchor_dims = self._compute_dims()

    # アンカーボックスを計算します。
    def _compute_dims(self):

        anchor_dims_all = []
        for area in self._areas:
            anchor_dims = []
            for ratio in self.aspect_ratios:
                anchor_height = tf.math.sqrt(area / ratio)
                anchor_width = area / anchor_height
                dims = tf.reshape(
                    tf.stack([anchor_width, anchor_height], axis=-1), [1, 1, 2]
                )
                for scale in self.scales:
                    anchor_dims.append(scale * dims)
            anchor_dims_all.append(tf.stack(anchor_dims, axis=-2))
        return anchor_dims_all

    # アンカーボックスを取得します
    def _get_anchors(self, feature_height, feature_width, level):

        #Arguments:
        #  feature_height: 特徴マップの高さ
        #  feature_width: 特徴マップの幅
        #  level: 特徴ピラミッド内の特徴マップのレベルを示します
        # Returns: アンカーボックスの形状を取得します
        # (feature_height * feature_width * num_anchors, 4)

        rx = tf.range(feature_width, dtype=tf.float32) + 0.5
        ry = tf.range(feature_height, dtype=tf.float32) + 0.5
        centers = tf.stack(tf.meshgrid(rx, ry), axis=-1) * self._strides[level - 3]
        centers = tf.expand_dims(centers, axis=-2)
        centers = tf.tile(centers, [1, 1, self._num_anchors, 1])
        dims = tf.tile(
            self._anchor_dims[level - 3], [feature_height, feature_width, 1, 1]
        )
        anchors = tf.concat([centers, dims], axis=-1)
        return tf.reshape(
            anchors, [feature_height * feature_width * self._num_anchors, 4]
        )

    # すべての特徴マップのアンカーボックスを取得します
    def get_anchors(self, image_height, image_width):

        anchors = [
            self._get_anchors(
                tf.math.ceil(image_height / 2 ** i),
                tf.math.ceil(image_width / 2 ** i),
                i,
            )
            for i in range(3, 8)
        ]
        return tf.concat(anchors, axis=0)
データの前処理
画像の前処理には2つのステップが含まれます。
① 画像のサイズ変更
② Augmentation(拡張)の適用
画像とともに必要に応じてバウンディングボックスが再スケーリングされ、反転されます。
# 画像をランダムにAugmentationする関数
def random_flip_horizontal(image, boxes):
  #Arguments:
  #   image: (height, width, channels)
  #   boxes: (num_boxes, 4)
  if tf.random.uniform(()) > 0.5:
    image = tf.image.flip_left_right(image)
    boxes = tf.stack(
          [1 - boxes[:, 2], boxes[:, 1], 1 - boxes[:, 0], boxes[:, 3]], axis=-1
      )
  return image, boxes
# 画像サイズを変更する関数
# 1.短辺が「min_side」と等しくなるように画像のサイズを変更します
# 2.長辺が「max_side」より大きい場合は、画像のサイズを変更します
# 3.画像の形状を「stride」で割り切れるように、左右にゼロを埋めます
def resize_and_pad_image(
image, min_side=800.0, max_side=1333.0, jitter=[640, 1024], stride=128.0
):
#Arguments:
# image:(height, width, channels)
# min_side: 画像幅の最小値です
# max_side: 画像幅の最大値です
# jitter: [minimum_size, maximum_size] ランダムに画像にノイズを加えます
# stride: (image_size / feature_map_size)
#Returns:
# image: サイズ変更され、パディングされた画像が返ってきます
# image_shape: パディングする前の画像サイズが返ってきます
# ratio: 画像サイズを変更するための比率が返ってきます
image_shape = tf.cast(tf.shape(image)[:2], dtype=tf.float32)
# jitterが設定されているかを確認する
if jitter is not None:
min_side = tf.random.uniform((), jitter[0], jitter[1], dtype=tf.float32)
# 画像の変更比率を求めます
ratio = min_side / tf.reduce_min(image_shape)
if ratio * tf.reduce_max(image_shape) > max_side:
ratio = max_side / tf.reduce_max(image_shape)
image_shape = ratio * image_shape
# 画像サイズを変更する。
image = tf.image.resize(image, tf.cast(image_shape, dtype=tf.int32))
# 画像をパディングする。
padded_image_shape = tf.cast(
tf.math.ceil(image_shape / stride) * stride, dtype=tf.int32
)
image = tf.image.pad_to_bounding_box(
image, 0, 0, padded_image_shape[0], padded_image_shape[1]
)
return image, image_shape, ratio# データの処理
def preprocess_data(sample):
#Returns:
# image: (ランダムにAugumentationされる)サイズ変更とパディングされた画像が返されます。
# bbox: 形状が(num_objects, 4)で、[x, y, width, height]にて示されるバウンディングボックス
# class_id: (num_objects,)
image = sample["image"]
bbox = swap_xy(sample["objects"]["bbox"])
class_id = tf.cast(sample["objects"]["label"], dtype=tf.int32)
# 画像をランダムにAugmentationする
image, bbox = random_flip_horizontal(image, bbox)
# 画像サイズを変更してパディングする
image, image_shape, _ = resize_and_pad_image(image)
# バウンディングボックスを作る
bbox = tf.stack(
[
bbox[:, 0] * image_shape[1],
bbox[:, 1] * image_shape[0],
bbox[:, 2] * image_shape[1],
bbox[:, 3] * image_shape[0],
],
axis=-1,
)
bbox = convert_to_xywh(bbox)
return image, bbox, class_idラベルをエンコードするクラス
バウンディングボックスとクラスIDで構成されるラベルは、トレーニングに使える様なターゲットに変換する必要があります。そのために、以下の手順を踏みます。
・指定された画像サイズのアンカーボックスを生成します
・正解ボックスをアンカーボックスに割り当てます
・オブジェクトが割り当てられていないアンカーボックスに関しては、IOUに応じて「背景クラスが割り当てられる」か、「除外」されます。
・アンカーボックスを使用して分類および回帰ターゲットが生成されます。
# ラベルエンコーダ—
class LabelEncoder:

    def __init__(self):
        self._anchor_box = AnchorBox()
        self._box_variance = tf.convert_to_tensor(
            [0.1, 0.1, 0.2, 0.2], dtype=tf.float32
        )

    # IoUに基づいて、正解ボックスとアンカーボックスをマッチさせる関数
    def _match_anchor_boxes(
        self, anchor_boxes, gt_boxes, match_iou=0.5, ignore_iou=0.4
    ):
        #1.正解ボックスとアンカーボックスのIOUを計算します
        #2.IoUが設定値「match_iou」より大きく、最大であるアンカーボックスが割り当てられます。
        #3.最大IoUが設定「ignore_iou」未満の場合、アンカーボックスには背景クラスが割り当てられます。
        #4.クラスが割り当てられなかった残りのアンカーボックスはトレーニング中除外されます。

        #Arguments:
        #  anchor_boxes:アンカーボックスは(total_anchors, 4)で示され、
        #         各アンカーボックスは[x, y, width, height]で構成されます。
        #  gt_boxes: 正解ボックス群は(num_objects, 4)で示され、
        #       各正解ボックスは[x, y, width, height]で構成されます。
        #  match_iou: ラベルとして認識するIoUの閾値を設定します
        #  ignore_iou: 無意味なボックスと判定するIoUの閾値を設定します

        #Returns:
        #  matched_gt_idx: マッチした物体のインデックスです。
        #  positive_mask: 正解ボックスと適合したアンカーボックスです
        #  ignore_mask: 無意味と判定されたアンカーボックスです。

        iou_matrix = compute_iou(anchor_boxes, gt_boxes)
        max_iou = tf.reduce_max(iou_matrix, axis=1)
        matched_gt_idx = tf.argmax(iou_matrix, axis=1)
        positive_mask = tf.greater_equal(max_iou, match_iou)
        negative_mask = tf.less(max_iou, ignore_iou)
        ignore_mask = tf.logical_not(tf.logical_or(positive_mask, negative_mask))
        return (
            matched_gt_idx,
            tf.cast(positive_mask, dtype=tf.float32),
            tf.cast(ignore_mask, dtype=tf.float32),
        )

    # 正解ボックスをターゲットに変換する
    def _compute_box_target(self, anchor_boxes, matched_gt_boxes):
        box_target = tf.concat(
            [
                (matched_gt_boxes[:, :2] - anchor_boxes[:, :2]) / anchor_boxes[:, 2:],
                tf.math.log(matched_gt_boxes[:, 2:] / anchor_boxes[:, 2:]),
            ],
            axis=-1,
        )
        box_target = box_target / self._box_variance
        return box_target

    # ひとつの画像に対して正解ボックスを提示する関数です。
    def _encode_sample(self, image_shape, gt_boxes, cls_ids):

        anchor_boxes = self._anchor_box.get_anchors(image_shape[1], image_shape[2])
        cls_ids = tf.cast(cls_ids, dtype=tf.float32)
        matched_gt_idx, positive_mask, ignore_mask = self._match_anchor_boxes(
            anchor_boxes, gt_boxes
        )
        matched_gt_boxes = tf.gather(gt_boxes, matched_gt_idx)
        box_target = self._compute_box_target(anchor_boxes, matched_gt_boxes)
        matched_gt_cls_ids = tf.gather(cls_ids, matched_gt_idx)
        cls_target = tf.where(
            tf.not_equal(positive_mask, 1.0), -1.0, matched_gt_cls_ids
        )
        cls_target = tf.where(tf.equal(ignore_mask, 1.0), -2.0, cls_target)
        cls_target = tf.expand_dims(cls_target, axis=-1)
        label = tf.concat([box_target, cls_target], axis=-1)
        return label

    # 画像のまとまりに対して正解ボックスを提示する関数です
    def encode_batch(self, batch_images, gt_boxes, cls_ids):
        images_shape = tf.shape(batch_images)
        batch_size = images_shape[0]

        labels = tf.TensorArray(dtype=tf.float32, size=batch_size, dynamic_size=True)
        for i in range(batch_size):
            label = self._encode_sample(images_shape, gt_boxes[i], cls_ids[i])
            labels = labels.write(i, label)
        batch_images = tf.keras.applications.resnet.preprocess_input(batch_images)
        return batch_images, labels.stack()
RetinaNetの実装
ResNet50バックボーンの構築
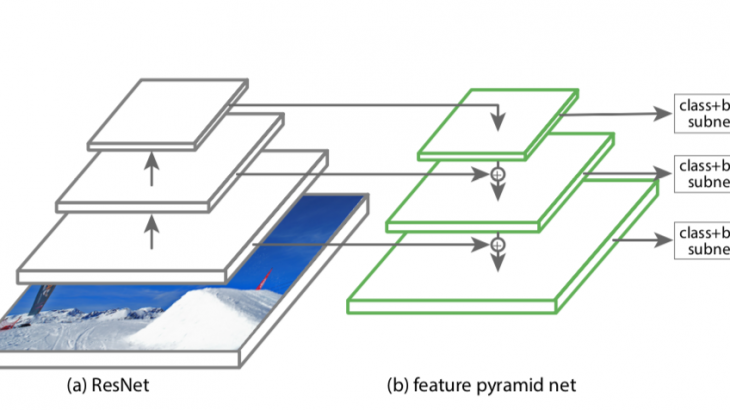
RetinaNetは、特徴ピラミッドネットワークを構築するResNetベースのバックボーンを使用します。ResNet50をバックボーンとして使用し、ストライド8、16、および32でフィーチャマップを返します。
# 事前学習されたResNetモデルを利用します
def get_backbone():

    backbone = keras.applications.ResNet50(
        include_top=False, input_shape=[None, None, 3]
    )
    c3_output, c4_output, c5_output = [
        backbone.get_layer(layer_name).output
        for layer_name in ["conv3_block4_out", "conv4_block6_out", "conv5_block3_out"]
    ]
    return keras.Model(
        inputs=[backbone.inputs], outputs=[c3_output, c4_output, c5_output]
    )
カスタムレイヤーとしての特徴ピラミッドネットワークの構築
RetinaNetの特徴の一つである特徴ピラミッドネットワークを追加します。
class FeaturePyramid(keras.layers.Layer):
    # Attributes:
    #  num_classes: データセット内のクラス数です
    #  backbone: フィーチャーピラミッドネットワークを支えているモデルです
    #      (今回はResNetになります)


    def __init__(self, backbone=None, **kwargs):
        super(FeaturePyramid, self).__init__(name="FeaturePyramid", **kwargs)
        self.backbone = backbone if backbone else get_backbone()
        self.conv_c3_1x1 = keras.layers.Conv2D(256, 1, 1, "same")
        self.conv_c4_1x1 = keras.layers.Conv2D(256, 1, 1, "same")
        self.conv_c5_1x1 = keras.layers.Conv2D(256, 1, 1, "same")
        self.conv_c3_3x3 = keras.layers.Conv2D(256, 3, 1, "same")
        self.conv_c4_3x3 = keras.layers.Conv2D(256, 3, 1, "same")
        self.conv_c5_3x3 = keras.layers.Conv2D(256, 3, 1, "same")
        self.conv_c6_3x3 = keras.layers.Conv2D(256, 3, 2, "same")
        self.conv_c7_3x3 = keras.layers.Conv2D(256, 3, 2, "same")
        self.upsample_2x = keras.layers.UpSampling2D(2)

    def call(self, images, training=False):
        c3_output, c4_output, c5_output = self.backbone(images, training=training)
        p3_output = self.conv_c3_1x1(c3_output)
        p4_output = self.conv_c4_1x1(c4_output)
        p5_output = self.conv_c5_1x1(c5_output)
        p4_output = p4_output + self.upsample_2x(p5_output)
        p3_output = p3_output + self.upsample_2x(p4_output)
        p3_output = self.conv_c3_3x3(p3_output)
        p4_output = self.conv_c4_3x3(p4_output)
        p5_output = self.conv_c5_3x3(p5_output)
        p6_output = self.conv_c6_3x3(c5_output)
        p7_output = self.conv_c7_3x3(tf.nn.relu(p6_output))
        return p3_output, p4_output, p5_output, p6_output, p7_output
分類ヘッドとボックス回帰ヘッドの構築
RetinaNetモデルには、バウンディングボックスの回帰予測とオブジェクトのクラス確率を予測するためにそれぞれ個別のヘッドがあります。これらのヘッドは、フィーチャピラミッドのすべてのフィーチャマップ間で共有されています。
def build_head(output_filters, bias_init):

    #Arguments:
    #  output_filters: 最終層でのフィルターの数です
    #  bias_init: 最終層でのバイアスの初期化子です

    #Returns:
    #  分類及びフィルター数に応じたボックスの数を返します。

    head = keras.Sequential([keras.Input(shape=[None, None, 256])])
    kernel_init = tf.initializers.RandomNormal(0.0, 0.01)
    for _ in range(4):
        head.add(
            keras.layers.Conv2D(256, 3, padding="same", kernel_initializer=kernel_init)
        )
        head.add(keras.layers.ReLU())
    head.add(
        keras.layers.Conv2D(
            output_filters,
            3,
            1,
            padding="same",
            kernel_initializer=kernel_init,
            bias_initializer=bias_init,
        )
    )
    return head
RetinaNetを実装します
ここまで作ってきたものをまとめてRetinaNetを実装します。
# RetianaNetを実装します
class RetinaNet(keras.Model):

    def __init__(self, num_classes, backbone=None, **kwargs):
        super(RetinaNet, self).__init__(name="RetinaNet", **kwargs)
        self.fpn = FeaturePyramid(backbone)
        self.num_classes = num_classes

        prior_probability = tf.constant_initializer(-np.log((1 - 0.01) / 0.01))
        self.cls_head = build_head(9 * num_classes, prior_probability)
        self.box_head = build_head(9 * 4, "zeros")

    def call(self, image, training=False):
        features = self.fpn(image, training=training)
        N = tf.shape(image)[0]
        cls_outputs = []
        box_outputs = []
        for feature in features:
            box_outputs.append(tf.reshape(self.box_head(feature), [N, -1, 4]))
            cls_outputs.append(
                tf.reshape(self.cls_head(feature), [N, -1, self.num_classes])
            )
        cls_outputs = tf.concat(cls_outputs, axis=1)
        box_outputs = tf.concat(box_outputs, axis=1)
        return tf.concat([box_outputs, cls_outputs], axis=-1)
RetinaNetに予測デコーダーを実装することで、予測を可能にします。
# RetinaNetモデルの予測デコーダーを実装します
class DecodePredictions(tf.keras.layers.Layer):
    """
    Attributes:
      num_classes: データセットの分類数
      confidence_threshold: 最小クラス確率(設定値以下になると、剪定されます)
      nms_iou_threshold: NMSのIoU
      max_detections_per_class: 各クラスごとの検出する数
      max_detections: すべてのクラスに関して検出する数
      box_variance: バウンディングボックスのスケーリング予測に使用されるスケーリング係数。
    """

    def __init__(
        self,
        num_classes=80,
        confidence_threshold=0.05,
        nms_iou_threshold=0.5,
        max_detections_per_class=100,
        max_detections=100,
        box_variance=[0.1, 0.1, 0.2, 0.2],
        **kwargs
    ):
        super(DecodePredictions, self).__init__(**kwargs)
        self.num_classes = num_classes
        self.confidence_threshold = confidence_threshold
        self.nms_iou_threshold = nms_iou_threshold
        self.max_detections_per_class = max_detections_per_class
        self.max_detections = max_detections

        self._anchor_box = AnchorBox()
        self._box_variance = tf.convert_to_tensor(
            [0.1, 0.1, 0.2, 0.2], dtype=tf.float32
        )

    def _decode_box_predictions(self, anchor_boxes, box_predictions):
        boxes = box_predictions * self._box_variance
        boxes = tf.concat(
            [
                boxes[:, :, :2] * anchor_boxes[:, :, 2:] + anchor_boxes[:, :, :2],
                tf.math.exp(boxes[:, :, 2:]) * anchor_boxes[:, :, 2:],
            ],
            axis=-1,
        )
        boxes_transformed = convert_to_corners(boxes)
        return boxes_transformed

    def call(self, images, predictions):
        image_shape = tf.cast(tf.shape(images), dtype=tf.float32)
        anchor_boxes = self._anchor_box.get_anchors(image_shape[1], image_shape[2])
        box_predictions = predictions[:, :, :4]
        cls_predictions = tf.nn.sigmoid(predictions[:, :, 4:])
        boxes = self._decode_box_predictions(anchor_boxes[None, ...], box_predictions)

        return tf.image.combined_non_max_suppression(
            tf.expand_dims(boxes, axis=2),
            cls_predictions,
            self.max_detections_per_class,
            self.max_detections,
            self.nms_iou_threshold,
            self.confidence_threshold,
            clip_boxes=False,
        )
Smooth L1 LossとFocal Lossをkerasカスタム損失として実装します。
(これらの損失関数について詳しくは解説記事「Focal Lossを提案した革新的物体検出モデルRetinaNetを解説!」(https://deepsquare.jp/2020/10/retinanet/)をご参照ください。)
# Smooth L1 LossとFocal Lossをkerasカスタム損失として実装します
class RetinaNetBoxLoss(tf.losses.Loss):
    """ Smooth L1 loss"""

    def __init__(self, delta):
        super(RetinaNetBoxLoss, self).__init__(
            reduction="none", name="RetinaNetBoxLoss"
        )
        self._delta = delta

    def call(self, y_true, y_pred):
        difference = y_true - y_pred
        absolute_difference = tf.abs(difference)
        squared_difference = difference ** 2
        loss = tf.where(
            tf.less(absolute_difference, self._delta),
            0.5 * squared_difference,
            absolute_difference - 0.5,
        )
        return tf.reduce_sum(loss, axis=-1)


class RetinaNetClassificationLoss(tf.losses.Loss):
    """ Focal loss"""

    def __init__(self, alpha, gamma):
        super(RetinaNetClassificationLoss, self).__init__(
            reduction="none", name="RetinaNetClassificationLoss"
        )
        self._alpha = alpha
        self._gamma = gamma

    def call(self, y_true, y_pred):
        cross_entropy = tf.nn.sigmoid_cross_entropy_with_logits(
            labels=y_true, logits=y_pred
        )
        probs = tf.nn.sigmoid(y_pred)
        alpha = tf.where(tf.equal(y_true, 1.0), self._alpha, (1.0 - self._alpha))
        pt = tf.where(tf.equal(y_true, 1.0), probs, 1 - probs)
        loss = alpha * tf.pow(1.0 - pt, self._gamma) * cross_entropy
        return tf.reduce_sum(loss, axis=-1)


class RetinaNetLoss(tf.losses.Loss):

    def __init__(self, num_classes=80, alpha=0.25, gamma=2.0, delta=1.0):
        super(RetinaNetLoss, self).__init__(reduction="auto", name="RetinaNetLoss")
        self._clf_loss = RetinaNetClassificationLoss(alpha, gamma)
        self._box_loss = RetinaNetBoxLoss(delta)
        self._num_classes = num_classes

    def call(self, y_true, y_pred):
        y_pred = tf.cast(y_pred, dtype=tf.float32)
        box_labels = y_true[:, :, :4]
        box_predictions = y_pred[:, :, :4]
        cls_labels = tf.one_hot(
            tf.cast(y_true[:, :, 4], dtype=tf.int32),
            depth=self._num_classes,
            dtype=tf.float32,
        )
        cls_predictions = y_pred[:, :, 4:]
        positive_mask = tf.cast(tf.greater(y_true[:, :, 4], -1.0), dtype=tf.float32)
        ignore_mask = tf.cast(tf.equal(y_true[:, :, 4], -2.0), dtype=tf.float32)
        clf_loss = self._clf_loss(cls_labels, cls_predictions)
        box_loss = self._box_loss(box_labels, box_predictions)
        clf_loss = tf.where(tf.equal(ignore_mask, 1.0), 0.0, clf_loss)
        box_loss = tf.where(tf.equal(positive_mask, 1.0), box_loss, 0.0)
        normalizer = tf.reduce_sum(positive_mask, axis=-1)
        clf_loss = tf.math.divide_no_nan(tf.reduce_sum(clf_loss, axis=-1), normalizer)
        box_loss = tf.math.divide_no_nan(tf.reduce_sum(box_loss, axis=-1), normalizer)
        loss = clf_loss + box_loss
        return loss
モデルの学習
モデルの学習に必要な項目を設定します。
トレーニングパラメータを設定します
model_dir = "retinanet/"
label_encoder = LabelEncoder()

num_classes = 80
batch_size = 2

learning_rates = [2.5e-06, 0.000625, 0.00125, 0.0025, 0.00025, 2.5e-05]
learning_rate_boundaries = [125, 250, 500, 240000, 360000]
learning_rate_fn = tf.optimizers.schedules.PiecewiseConstantDecay(
    boundaries=learning_rate_boundaries, values=learning_rates
)
モデルを初期化し、コンパイルします
callbacks_list = [
    tf.keras.callbacks.ModelCheckpoint(
        filepath=os.path.join(model_dir, "weights" + "_epoch_{epoch}"),
        monitor="loss",
        save_best_only=False,
        save_weights_only=True,
        verbose=1,
    )
]
TensorFlowデータセットを使用してCOCO2017データセットをロードします
# 「data_dir=None」と設定するとすべてのデータを読み込みます

(train_dataset, val_dataset), dataset_info = tfds.load(
    "coco/2017", split=["train", "validation"], with_info=True, data_dir="data"
)

# 効率よく確実に学習できるようにパイプラインを作成します
autotune = tf.data.experimental.AUTOTUNE
train_dataset = train_dataset.map(preprocess_data, num_parallel_calls=autotune)
train_dataset = train_dataset.shuffle(8 * batch_size)
train_dataset = train_dataset.padded_batch(
    batch_size=batch_size, padding_values=(0.0, 1e-8, -1), drop_remainder=True
)
train_dataset = train_dataset.map(
    label_encoder.encode_batch, num_parallel_calls=autotune
)
train_dataset = train_dataset.apply(tf.data.experimental.ignore_errors())
train_dataset = train_dataset.prefetch(autotune)

val_dataset = val_dataset.map(preprocess_data, num_parallel_calls=autotune)
val_dataset = val_dataset.padded_batch(
    batch_size=1, padding_values=(0.0, 1e-8, -1), drop_remainder=True
)
val_dataset = val_dataset.map(label_encoder.encode_batch, num_parallel_calls=autotune)
val_dataset = val_dataset.apply(tf.data.experimental.ignore_errors())
val_dataset = val_dataset.prefetch(autotune)
モデルを学習させます
# すべてのデータセットを利用する場合は、以下のコメントアウトをはずしてください。
# train_steps_per_epoch = dataset_info.splits["train"].num_examples // batch_size
# val_steps_per_epoch = \
#     dataset_info.splits["validation"].num_examples // batch_size

# train_steps = 4 * 100000
# epochs = train_steps // train_steps_per_epoch

epochs = 1

# すべてのデータセットを利用するときは「.take」を取ってください。

model.fit(
    train_dataset.take(100),
    validation_data=val_dataset.take(50),
    epochs=epochs,
    callbacks=callbacks_list,
    verbose=1,
)
モデルの利用
モデルの重みを利用します
# 「model_dir」とすることでダウンロードしたモデルを使用しないことができます
weights_dir = "data"

latest_checkpoint = tf.train.latest_checkpoint(weights_dir)
model.load_weights(latest_checkpoint)
物体検出を行います
def prepare_image(image):
    image, _, ratio = resize_and_pad_image(image, jitter=None)
    image = tf.keras.applications.resnet.preprocess_input(image)
    return tf.expand_dims(image, axis=0), ratio

# ここではデータセット内の画像を用いて確認するように設定しています。
# お手持ちの画像で確認したい場合は、以下のval_datasetを変更してください。
val_dataset = tfds.load("coco/2017", split="validation", data_dir="data")
int2str = dataset_info.features["objects"]["label"].int2str

for sample in val_dataset.take(3):
    image = tf.cast(sample["image"], dtype=tf.float32)
    input_image, ratio = prepare_image(image)
    detections = inference_model.predict(input_image)
    num_detections = detections.valid_detections[0]
    class_names = [
        int2str(int(x)) for x in detections.nmsed_classes[0][:num_detections]
    ]
    visualize_detections(
        image,
        detections.nmsed_boxes[0][:num_detections] / ratio,
        class_names,
        detections.nmsed_scores[0][:num_detections],
    )